The Best Telescopes for Beginners in 2023
This guide will help you pick your first telescope, and we bet you’ll never want to put it down.

If you have picked up stargazing or astronomy recently, a telescope for beginners is one of the most important accessories you can buy. On some clear nights when the sky looks like it’s been sprinkled with gems, all you want to do is sit in the dark alone or with your loved ones and gaze at this nebulous wonder. While it might be enough for most people to sit and gaze at the stars, if you’re one of those who is curious about what’s going on right around us, then you will want to go about that with a telescope.
However, having no knowledge about technical equipment like a telescope can be quite a handicap when you want to get one. It is with this in mind that we created this list of the best telescopes you could use to guide you on your journey through the cosmos. With any of our top picks, you can enjoy many nights of marvelous stargazing, each bringing its own discovery.
Everything We Recommend
1. Best Product
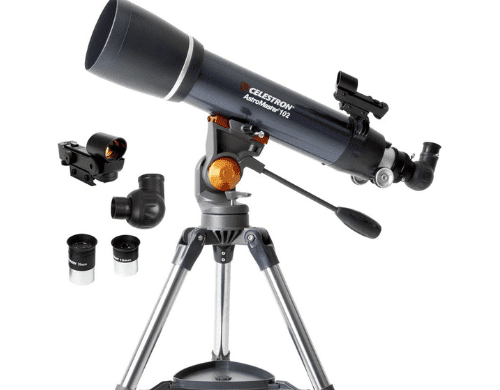
Celestron – AstroMaster 102AZ Refractor Telescope
2. Runner Up
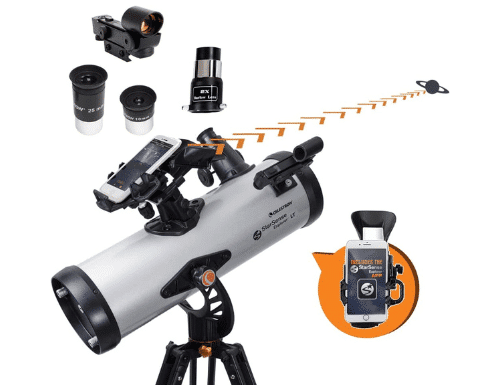
Celestron – StarSense Explorer LT 114AZ Telescope
3. Cost Effective
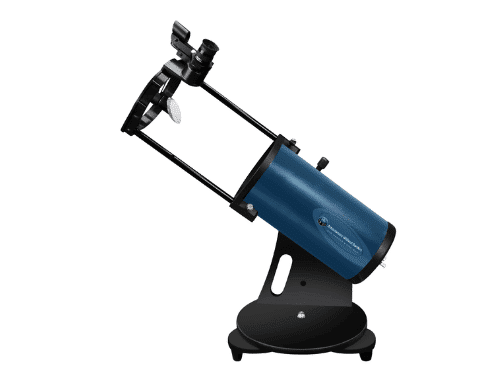
AWB OneSky Reflector Telescope
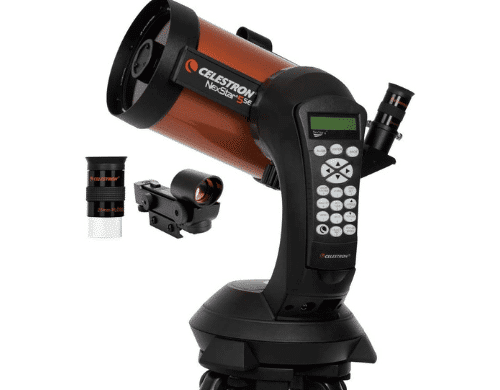
4. Almost Made the Cut
Celestron – NexStar 5SE Telescope
1. Best Product
Who It’s For
The fact that the Celestron AstroMaster 102AZ can be set up from the start without the use of any tools makes it ideal for first-time users who have no experience in astronomy or with the use of a telescope.
Why It’s Great
The Celestron AstroMaster 102AZ comes with a steel tripod, accessory tray, and manual included in the box, making it competitive with other options in the same price range. It can be easily moved due to its portability, so it can be used for spur-of-the-moment observations from the backyard or from the back window.
Potential Flaws
The portable design of this telescope does not make it any less of a burden for smaller or younger individuals to carry. Furthermore, the focus mechanism is greasy, and the tripod, mount, and eyepiece screws are readily unfastened. For those who prefer something else, although not readily lighter, we recommend the Celestron NexStar 5SE.
Other Features
The Celestron AstroMaster 102AZ is not as expensive as most other telescopes by Celestron and can be gotten without digging deeply into your budget. The telescope also comes with a two-year warranty and occasional discounts if purchased directly on the site.
The Altazimuth mount on the Celestron AstroMaster 102AZ provides movement in both the horizontal and vertical planes, allowing for a focal length of 660 millimeters. The package contains a red dot finder scope and two eyepieces (10mm, giving 66x magnification, and 20mm, providing 33x magnification). Starry Night astronomy software is included as well; this comes on a CD for individuals whose computers don't have CD drives, but there's also an app for Android and iOS if you prefer those platforms. An accessory tray is included and clips into the tripod's middle leg. Though it's not required, having a designated spot to stow away the scope's lens and eyepiece caps when they aren't in use is a nice convenience.
The scope is secured in its mount via two screws after being slipped into place on the included full-height steel tripod. Although this would make things more stable, the extra weight would make them less mobile. The included sturdy steel tripod ensures stable images and comfortable viewing. With it, you'll feel as if you're staring directly at distant objects. Probably the highest endorsement for the Celestron AstroMaster 102AZ is that it is easy to use.
Product Specifications
Optical Design: Refractor
Aperture: 102mm (4")
Focal Length: 660mm (26")
Focal Ratio: f/6.5
Finderscope: Built-in Red Dot Finder (Reflex)
Optical Tube: Aluminum
Highest Useful Magnification: 241x
Lowest Useful Magnification: 15x
Product Dimensions: 36 x 30 x 50 inches
Item Weight: 2.43 pounds
Mount Description: Altazimuth Mount
2. Runner Up
Who It’s For
The Celestron StarSense Explorer LT 114 is a great telescope for both amateur astronomers and professionals, and it will appeal especially to those who don't have much spare time to devote to complicated setups.
Why It’s Great
When you place your smartphone with the StarSense Explore app in the custom-made dock, it will immediately begin scanning the sky and determining the coordinates of various celestial objects. More than a hundred objects, such as planets, galaxies, nebulae, and star clusters, are visible through the 4.5" (114 mm) optics.
Potential Flaws
Most people who have used the StarSense Explorer LT 114AZ commend it for the features it provides, with the only complaint being that it does not come as computerized as the other more expensive types. Those who have enjoyed computerized mounts recommend that we try the NexStar 5SE if we need a great alternative.
Other Features
The StarSense Explorer LT 114AZ is a bit more expensive than our pick. This is because of its more technological features as opposed to those of the traditional telescope. During use, we discovered that this telescope can be put together in under twenty minutes. This reflector features Celestron's StarSense technology, making it simple to position the telescope. It aids the onboard GoTo system in determining the instrument's heading.
By downloading the StarSense app and placing their smartphone camera in the telescope's eyepiece, skywatchers can have the technology determine their orientation relative to the stars in their field of vision. Clear images can be obtained, but several eyepieces and filters are required to distinguish the various atmospheric bands.
The Celestron StarSense app provides interesting information about each of the objects you can watch, which is a great feature of the Celestron StarSense series. To really immerse yourself, you need to know what you're looking at, and this helps you do just that.
A 114 mm telescope collects 260 times as much light as the naked eye, allowing for improved views of both nearby (such as the planets) and distant celestial objects (like other galaxies). With the manual slow motion controls of the alt-azimuth mount, you may effortlessly point the telescope in any direction. A full-size metal tripod with a spreader bar for stability and a tray to store extra accessories is provided.
The StarSense Explorer LT 114 impressed us with its solid construction and reliable operation as we went from target to target. The only major drawback to this scope was the manual operation.
Product Specifications
Optical Design: Newtonian Reflector
Aperture: 114 mm (4.5")
Focal Length: 1000 mm (39.3")
Focal Ratio: f/9
Finderscope: Built-in Red Dot Finder
Optical Tube: Steel
Highest Useful Magnification: 269x
Lowest Useful Magnification: 16x
Product Dimensions: 38 x 33 x 52 inches
Item Weight: 10.36 pounds
Mount Description: Altazimuth Mount
3. Cost Effective
Who It’s For
The OneSky is much more than just another tabletop telescope; it combines a large number of intriguing and helpful features at an affordable price. Its compact size and ease of portability make it a great choice for both amateurs and professionals.
Why It’s Great
The OneSky's design is simple. It's an alt-azimuth mount with a short-focus Newtonian reflector for your tabletop. The attention to detail and thoughtful execution of the OneSky set it apart from the rest of the competition.
Potential Flaws
We discovered that the telescope's plastic shield, which can be found opposite the focuser, plays a crucial role in its baffling. Although effective, the shield was too small to be truly useful in particularly bright settings. Our preferred alternative choice was the StarSense Explorer LT 114AZ.
Other Features
The OneSky, manufactured by Celestron, is the most affordable telescope you can get at a great price. Astronomers Without Borders uses the proceeds from the sale of this telescope to fund new educational initiatives in the field of astronomy in developing nations.
During our tests, we found that the OneSky came with two eyepieces of 10mm and 225mm, which provide a wide range of magnification. This entry-level telescope offers a wide field of view for its price, so you may use it to observe everything from the moon to some deep-sky objects.
In terms of portability, the OneSky is excellent. The 24-inch viewing length of the optical truss tube assembly can be reduced to 14 inches, and the whole thing only weighs 14 pounds. When the OneSky telescope is placed on a table or other stable platform, the simple alt-azimuth tabletop Dobsonian mount provides steady and smooth tracking. We found this swiveling mount, which has a carry handle built right in, to be reasonably steady and smooth during our nighttime sky searches.
The scope's clever retractable tube is one of its best features. The 24-inch (61 cm) long optical tube assembly may be collapsed down to a mere 14 inches (36 cm) in length for ease of transport and storage. The optical tube of the scope is secured to the mount by means of a hand knob and a Vixen-style dovetail assembly. The dovetail facilitates leveling the scope on its vertical axis.
While comparable tabletop reflectors employ rack-and-pinion focusers, OneSky's ingenious helical focuser makes focusing the telescope a breeze. Although it's great for fine-tuning focus, especially at high magnifications, the eyepiece could shift slightly out of focus when the scope was moved through a broad arc of elevation due to the helical threads' lack of rigidity.
Product Specifications
Optical Design: Newtonian Reflector
Aperture: 5 inches
Focal Length: 650 mm (25.6”).
Focal Ratio: f/9
Finderscope: Red Dot Finder
Optical Tube: Steel
Highest Useful Magnification: 200x
Product Dimensions: 24 inches
Item Weight: 14 pounds
Mount Description: Dobsonian Altazimuth Mount
4. Almost Made the Cut
Who It’s For
The Nexstar 5SE is a digital telescope. With its magnification, this implies that, with the correct eyepieces, it will be extremely competent for amateur astronomy, and the GoTo mount will make it easy to lock on celestial objects of interest, enriching the viewing experience.
Why It’s Great
Its primary 5-inch mirror is perfect for capturing detailed, up-close images of the Moon and brilliant planets, and it also opens the door to gazing at far-off star clusters and galaxies. This telescope is controlled by a handheld controller connected to a fully automated computer system.
Potential Flaws
The NexStar 5SE is powered by eight standard AA batteries. Power from these batteries is quickly depleted when the mount is in use, leaving only two to four hours of runtime on average. It's possible that the mount can drain your battery if you stay out late. However, if you prefer a more traditional option, you would prefer our top pick.
Other Features
The Nexstar 5SE is Celestron’s iconic telescope. This makes it quite expensive and is the reason we chose to put it last on our list. It is an excellent product, but it sure would cost a lot for its worth.
During our tests, we found that it was the mount, and not the telescope, that contained the GPS capabilities. The NexStar 5SE provides a database of almost 40,000 nocturnal objects in response to user inputs such as date, time, and the nearest city to the observing site. Using this database, you can learn more about the things you observe via the telescope and direct it to look for others. The Tour function provides a curated selection of must-see attractions based on your current location and available time.
The specifications for this unit state that it has a focal length of 1250mm and an aperture of 125mm, yielding a rather narrow focal ratio of f/10. Therefore, the optics are better suited for observing planets, yet with a 2-inch eyepiece, you can still see stunning views of the cosmos as a whole. The included steel tripod is extremely strong, and the optical tube may be attached to it without any additional hardware.
In addition to its convenient foldability for transport and storage, the NexStar 5SE performed exceptionally well in our user tests. The NexStar 5SE not only comes with a comprehensive user manual but also a streamlined setup guide with step-by-step illustrations.
Product Specifications
Optical Design: Schmidt-Cassegrain
Aperture: 125mm (4.92")
Focal Length: 1250mm (49")
Focal Ratio: f/10
Finderscope: StarPointer red dot finderscope
Optical Tube: Aluminum
Highest Useful Magnification: 295x
Lowest Useful Magnification: 18x
Product Dimensions: 32.01 x 27.01 x 12.99 inches
Item Weight: 17.6 Pounds
Mount Description: Fully automated GoTo mount
Who This Is For
These telescopes are excellent choices for budding amateur astronomers who are interested in expanding their knowledge of the night sky. You can start by observing the moon via one of these scopes, then go on to the planets in our solar system, and lastly, look into the distant universe to investigate globular clusters, nebulae, and galaxies.
Refractor vs. reflector telescopes
To concentrate light into a sharp image, refractors use specialized lenses. Refracting telescopes require a longer optical tube in proportion to the size of the lens used to focus the image. Large refractors tend to be pricey because of the lens’s length and bulk, as well as the fact that high-quality production of such lenses can be difficult and time-consuming for glassmakers.
The employment of mirrors in a reflector creates many reflections of light within the optical tube, increasing the total length of the light beam. Due to the lower cost of producing huge mirrors as compared to large lenses, reflectors are often more cost-effective than refractors. Also, unlike doublet refractors, reflector telescopes are not affected by color fringing.
When choosing between a refractor telescope and a reflector telescope, it is crucial to know what you intend to observe through the instrument. Due to the one-of-a-kind lenses that are contained within refractors, these instruments are ideally suited for viewing distant galaxies and nebulae. Because the reflector telescope’s mirrors boost sensitivity across the spectrum, this type of instrument is best suited for seeing brighter and larger objects, such as the Moon and the planets.
What is more important: aperture or magnifying power?
The aperture of a telescope is the diameter of its primary optical element, which might be a lens or a mirror. The aperture of a scope is a determining factor in both its light-gathering capacity (how bright the image looks) and its resolution (how sharp the image appears). For those just starting out, apertures of between 2.8 inches (70 mm) and 10 inches are typically suggested. The greater the aperture of a telescope, the more spectacular its subject appears.
At the focal plane, a second lens or group of lenses known as an eyepiece creates an image suitable for human observation. The image from the objective is magnified in the eyepiece. In addition, there is a focal length for the eyepiece. Almost all telescopes include interchangeable eyepieces, so you may vary the magnification. Another rule of thumb is that a telescope’s greatest usable magnification is 50x the aperture size in inches. As we zoom out more, the image becomes too dark and hazy to be of any use.
The greatest magnification of a telescope is 40x to 60x (average = 50x) per inch of aperture, as a rule of thumb. Aperture is more significant than magnification because any magnification can be reached for practically any telescope by using different eyepieces.
Where best to go stargazing
In terms of darkness and accessibility, the latter is preferred. Find a place with a clear view of the east and west horizons, preferably high up and away from any nearby tall structures or trees. You should avoid man-made illumination as much as possible. Do not waste your stargazing time by leaving any exterior lights on if you intend to do so in your garden. If you want to see the stars, it’s best to avoid doing so when the moon is full.
Why You Should Trust Us
It would not be a smart move to spend money on a telescope that doesn’t deliver the experience you expected from it. Before making our pick, we asked several telescope users what the best feature was, and they said aperture. While this was important, we then went on our own to explore telescope types and read several reviews to make sure we had an objective point of view. After that, we talked with other users, asking them a series of questions ranging from cost to mounts and their quality before selecting our picks. When that was completed, we eliminated all other items until they were down to this list, and then we organized them by weighing price against quality.
How We Picked
Diameter of lenses
The diameter of the telescope’s light-gathering apparatus, or objective, determines how well it can resolve details in distant objects. The objective lens is the primary lens in a refracting telescope. The primary mirror of a reflecting telescope serves as the instrument’s objective. The telescope’s resolving power grows proportionally with the diameter of its objective. The diffraction limit describes the maximum level of detail a telescope is capable of resolving. The smallest possible angular separation between two perceptible objects is called the diffraction limit. For a given telescope, the diffraction limit decreases as the objective diameter increases. Consequently, the diffraction limit lowers with increasing diameter, allowing larger telescopes to resolve progressively fainter objects.
Steady mount/stand
You can’t have respectable observing or astrophotography equipment without a respectable telescope mount. A telescope mount serves two purposes: it keeps your telescope stable while you view, and it allows you to adjust the telescope’s focus to pinpoint the location of the celestial objects you’re interested in. The first condition (stable support for your telescope) is typically satisfied by a mount’s combination of a solid tripod with legs made of wood or metal and the mount head. The mount’s two axes and any fine-tuning controls are normally housed in the metal mount head.
The Dobsonian mount, on the other hand, eliminates the need for a tripod by setting the pan-tilt head flat on the floor. Big, sturdy bearings on Dobsonian mounts are normally made of Teflon, while the mounts themselves are frequently crafted from wood or particleboard. This produces a robust, inexpensive mount that (potentially) can be moved along both axes with the touch of a finger.
A reliable mount is essential, and it doesn’t matter what kind you use. If there is any wiggle room or looseness, it will be quite annoying to watch. The optics perched atop the mount will pick up any movement in the mount and magnify it, impairing your view of the stars until the shaking stops. With a telescope, the slightest vibration from a shaky tripod leg can cause an object in the sky to appear to move drastically as seen through the eyepiece.
Smooth, pivoting headpiece
A finder scope, which is included with and typically attached to the telescope, is included in the package. Each finder scope features either a red dot or crosshairs that may be used to quickly and easily acquire target acquisition. However, tilting your telescope to gain clearer sight should not be a problem and should not cause vibrations that will disturb your stargazing. This depends on the mount and the mechanics of the telescope and is an important feature if you will have an uninterrupted evening with the stars.
Easy to set up
Telescopes can be very technical and using advanced types can be overwhelming to beginners as there will be so much to learn, but nothing will try your patience as much as the setup process and going through the manual to make sure everything is set well enough not to ruin your experience. Therefore, we chose telescopes that were easy to set up and took little time to get used to.
Easy to use
We focused on portable telescopes with features like finderscopes to help you zero in on certain celestial objects and on telescopes that are easy to use overall so that you’ll actually want to use them.
Price vs. quality
Telescopes are usually expensive. However, like all products, some are more expensive than others, while some provide the same features at a more cost-efficient rate to provide the same experience in a different way. We considered price against quality and settled for those that provided great value at a great cost.
Style/design
Everyone expects their telescope to be a classy piece of equipment they can show off when people come to visit and when it comes out to be used. This means that although the design does not equal the function, it should look good enough to be admired. Fortunately, our picks come with excellent designs and are packed with great styles.
Focal ratio
After striking a mirror or passing through a lens, light is focused onto a distant plane by the optic’s curvature. The focal length of the goal is the distance across which this occurs. To get the focal ratio, you have to divide the focal length by the diameter of the objective. This is ideal for viewing the moon, planets, and double stars, thanks to a long focal ratio’s increased magnification and a narrower field of view with a given eyepiece.
Extended objects like nebulae and galaxies can have their luminosity affected by the focal ratio as well. Under the same conditions, the image produced by a telescope with a focal ratio of f/5 will be four times as bright as that produced by one with a focal ratio of f/10. However, an f/5.6 lens will produce a half-size image.
Eyepiece
An eyepiece takes the light that has been collected and focused by your telescope and enlarges it so that it can be viewed by the human eye. If you want a clear view of that astronomical object, the eyepiece must perform this function well.
How We Picked
-
Diameter of Lenses
The most common telescope lens diameters range between four and five inches. A larger diameter means that the telescope is able to collect enough light, allowing you to see faraway objects with total clarity. Therefore, we made sure that our picks have excellent diameters.
-
Steady Mount/Stand
A wobbly telescope stand or mount can easily ruin your whole experience, and we don't want you to invest in equipment that will be unsatisfactory. That is why we focused on telescopes that had stable mounts and that would have no trouble stabilizing.
-
Smooth Pivoting Headpiece
You should be able to swing the telescope over the night sky to sweep through it for details without any distortions. A smooth headpiece is essential for such motions.
-
Cost-Effectiveness
Telescopes cost a lot, but you can get a great one at a good price. We made sure to select telescopes that would provide a great experience without being too expensive.
Care and Maintenance
Have a red light handy
There are two different kinds of cells in the human eye: cones, which are responsible for color vision, and rods, which are responsible for seeing in black and white under dim lighting. Our eyes’ rod cells are only sensitive to light at a wavelength of about 530 nm, so they are unable to detect all of the visible spectrum’s colors. As a result, the rod cells cannot see longer wavelengths, such as red light that ranges from about 635-700 nm. As the longest wavelength seen by cone cells, it is a leading choice for preserving night vision. Only L-type (red light-detecting) cone cells contribute to picture formation when a red light is used. After being exposed to dim light for around 20 minutes, the human body will begin manufacturing a chemical known as rhodopsin, allowing for the development of night vision. Therefore, to maintain scotopic (night) vision, you need red light.
Picking the best night to stargaze
The time immediately preceding, during, and immediately following each new Moon is ideal for stargazing because the Moon will not be visible. The sky is most spectacular on cold, dry winter nights if you can stand the chill. There is also no brilliant moon to obscure the visibility of dimmer stars at these times. Thousands of stars will be visible to the unaided eye, and the view through a telescope will be much more impressive. Many astronomers speak of an “observing season” that spans the fall, winter, and spring months for optimal stargazing. The period begins with the “fall back” of the clocks in October (when evenings grow longer by one hour) and ends with the “spring forward” of the clocks in March (nights become 1-hour shorter).
Do I need a star map to stargaze?
Yes, you will need to bring a star map so you can put the constellations you spot to use. You can find anything with a good star map. For starters, you’ll need a basic, all-sky map that’s easy to follow even with the naked eye and that pinpoints the locations of the brightest stars and constellations as they appear at your specific local time, date, and latitude on Earth. The star wheel (Night Sky Planisphere) is a useful star chart because it allows you to adjust the constellation view based on the time of day and the season. Beginner stargazers can also benefit greatly from using a stargazing app to help them find certain stars and constellations. You can just hold up your phone and the applications will figure out where you are.
Ensure your eyepiece is well secured and focused
The eyepiece acts essentially like a magnifying glass, allowing you to see details that would otherwise be too small to see. An ordinary telescope’s eyepiece brings the image generated by the objective lens within a few inches of the viewer. Your stargazing experience will depend heavily on how well it is set up, so give it some extra attention before you use it.
Keeping the lenses safe and clean
First, you need to clean the surface of any debris that may have landed there. This does not entail blowing across it with your mouth. Instead, try a can of compressed air or a camel hair brush. In order to blow and sweep at the same time, certain brushes feature air bulbs. If using a brush, sweep it lightly over the lens in a single direction, clearing it of dust with a quick flick after each pass. In order to avoid scratching the surface, many amateur astronomers opt to use compressed air instead of a brush. Put the can on its side, nozzle facing away from the lens, at least as far as the manufacturer specifies. Some of the propellants may hit the glass surface if the can is held too close to it or is at an angle. It’s preferable to use a series of little bursts of air rather than one long one.
After dusting, use a mild cleanser to remove fingerprints, skin oils, stains, and any other lingering dirt. Use a lens cleaning solution to moisten a square of sterile surgical cotton or lens tissue. Cotton balls, toilet paper, and facial tissue from the store shouldn’t be used. And they’re harsher than you’d expect. Gently blot the lens with a piece of cotton or lens tissue that has been dampened, not dripping wet. Then, you can dry the lens with a piece of lens tissue.
Ensure the mount is well secured and balanced before setting up your telescope
You must ensure the stability of your mount before proceeding (often overlooked by beginners). An unbalanced scope will have jerky motions, be unstable, and be prone to drift, whereas a well-balanced one will move more smoothly and prefer to stay in place until you reposition it. Worse, the little motors in a motorized scope can overheat and burn out if the scope is not balanced properly, which puts additional strain on the gears in the slow-motion controls. As telescopes vary, you should read the manual properly to know how best to balance your mount. Ensure that all screws are in place and that the mount itself is stable and not shaky before use.
Finding areas with less light pollution
Light pollution is the result of intentional and unintentional human activity, such as parking lots, sports arenas, street lights, and home lamps. The glow in the sky is the result of light diffused from all of these sources. For observing weak stars and meteors, the darker the sky, the better. As one moves further away from the city center, the amount of skyglow from light pollution decreases. Therefore, leaving the municipal limits and traveling at least 20-30 miles away is essential.
Sources and Research
Further Reading and Similar Topics

April 1, 2026
Global Astronomy Month
Get your telescope out, shine the lens and join other stargazers this month.

January 1, 2026
International Change Your Stars Month
Find out the origins of this holiday and what the 31 ideas could be.

April 13, 2026
International Dark Sky Week
Prepare to be amazed by the sight of cosmic wonders in our night sky this week.
March 20, 2026
Astrology Day
Astrology teaches us about how the alignment of the stars forms our personalities.


